So... I've told you about my storied past with eating fowl, right?
How, growing up, I'd never had tasty chicken or turkey? How (bless them) no one in my family ever really grasped how to roast a bird without it ending up dry and flavourless?
Sorry Mom, if you're reading this.
Well, the two things I've learned, which have become absolutely essential to cooking a good bird (to the point of it just not working out otherwise...) are:
- USE A MEAT THERMOMETER DAMN IT. Like seriously... why not? Your mother's mother's mother never used one, so she taught you to time it based on weight, or vague impressions of when 'juices run clear' or what-have-you. But we have this amazing tool at our disposal now. Many of them you can even just leave in, and program to go off when your desired temperature is reached. There is no reason not to use a meat thermometer except your own stubborn pride at thinking you can do it without. Just don't. It takes all the guess work out of foodbourne illness safety, and it WILL save you from over-cooking your fowl. It is probably the most important thing you can do when roasting a bird.
- DON'T SHY FROM SEASONING. Particularly salt. Sodium has been thought of negatively for decades now, but too many people aren't thinking straight about salt. When we say sodium is bad, almost 100% of the time, we're referring to processed foods, and added sodium. The kind of amounts we're talking about when you add a pinch here or there during regular, normal, home-made cooking, are not bad. Don't forget, we need salt in our diets.
- DRY BRINE FOR AT LEAST 48 HOURS. Preferably 72 hours. Yes. Three days of sitting, dry, in the fridge, open to the elements. Trust me. it works.
So that brings us to today's topic of discussion. Brining.
I used to do a wet brine, which is still better than no prep at all. This consists of soaking your bird in a mixture of salt and sugar and spices for at least 24 hours before cooking. This definitely infuses the flesh with flavour and moisture.
But... not as well, nor as efficiently as a dry brine.
I know, it seems counter-intuitive. How could a dry brine make your bird more moist than a wet brine??!!??
Well, I'll tell you.
It all has to do with science. In particular, concentration gradients. When you get a fresh bird, and before anything has been done to it, there exists within the tissues, a particular amount of... let's just call it... stuff. Well, that stuff wants to come out... if it can. Stuff wants to move from an area of high concentration to one of low concentration. That's just what stuff wants to do... and not just in turkeys, but in everything in the universe.
So how does this relate to wet vs. dry brining? The short answer is that a dry brine makes it so that this stuff has no where else to go but back into the turkey. The long answer? Well...
Applying salt directly to the tissues WILL pull out moisture and flavour. It will, and in fact the WORST thing you could do would be to apply a salt for too short a time, or even worse than that, apply a salt for half a day and then rinse it off! There goes all your good stuff.
So, in order to keep all that stuff inside your bird in a wet brine, you'd need to make the concentration of stuff in the water so high that the concentration inside the bird would be lower in comparison. And even then, it's only going to absorb a small amount of stuff.
A dry brine, on the other hand, will put everything (well, LOTS) back into the tissues. But not at first. At first that concentration gradient is wack high. It's crazy high on the outside of it because you've got the spices and salt and stuff literally sitting on top of it. So at first the stuff is going to go the OTHER way... out. But, because there is nowhere for that to go (no large pool of water into which this stuff can be dumped, dissolved, or spread into), all that turkey stuff doesn't go far (in fact, it goes into the brine). And, if you leave it long enough, the gradient will switch back and the flesh will actually suck all that stuff BACK IN!
The singular beauty of the dry brine is that, when re-absorbing, the bird has no choice but to ALSO bring with it all the flavours and spices you put on there, sucking it deep down into the meat tissues.
But this only happens if you leave it long enough. So the trick is to brine it for at least 48 hours, I like to do 72 hours.
The brine itself doesn't have to be complicated. As long as it has a shit tonne of salt, and a generous spoonful of sugar, you can add anything else you like in terms of herbs or spices.
Myself, and particularly for festive birds like Christmas Turkey, I like to do a bit of nutmeg, cloves, and generous amount of thyme.
You can see that that is not a small amount of salt. I like coarse salt, personally. And for this particular use I'd also recommend steering clear of the flavoured salts. Save those for finishing salt on steamed veggies and the like...
The hardest part (read: grossest part) is stretching the skin off of the flesh.
<shudder>
As a flexitarian who has gradually gotten his meat consumption down to a few times a month, this is especially disgusting.
But whatevs. Other people were counting on this turkey.
I don't want to write too much about it, but basically after you've removed the giblets, and plucked any remaining feathers that slipped through the cracks, begin gently spreading the skin away from the flesh.
I start at one end, and gently work my fingers in further and further.
You can get the entire turkey done this way, and if you're careful, you can do it without ripping the skin in any place.
I lucked out this go around, and managed to get the entire turkey skin lifted without a single tear.
It helps the fresher your turkey is.
You might need to go in from both sides to get all the way around, but once the whole bird has been skin-lifted, gently start tucking the brine in everywhere you can.
I like to just pour it down there and then sort of spread it around as evenly as I can.
Any excess can be spread on the skin itself, outside, but make sure as much of the flesh itself under the skin is covered as possible.
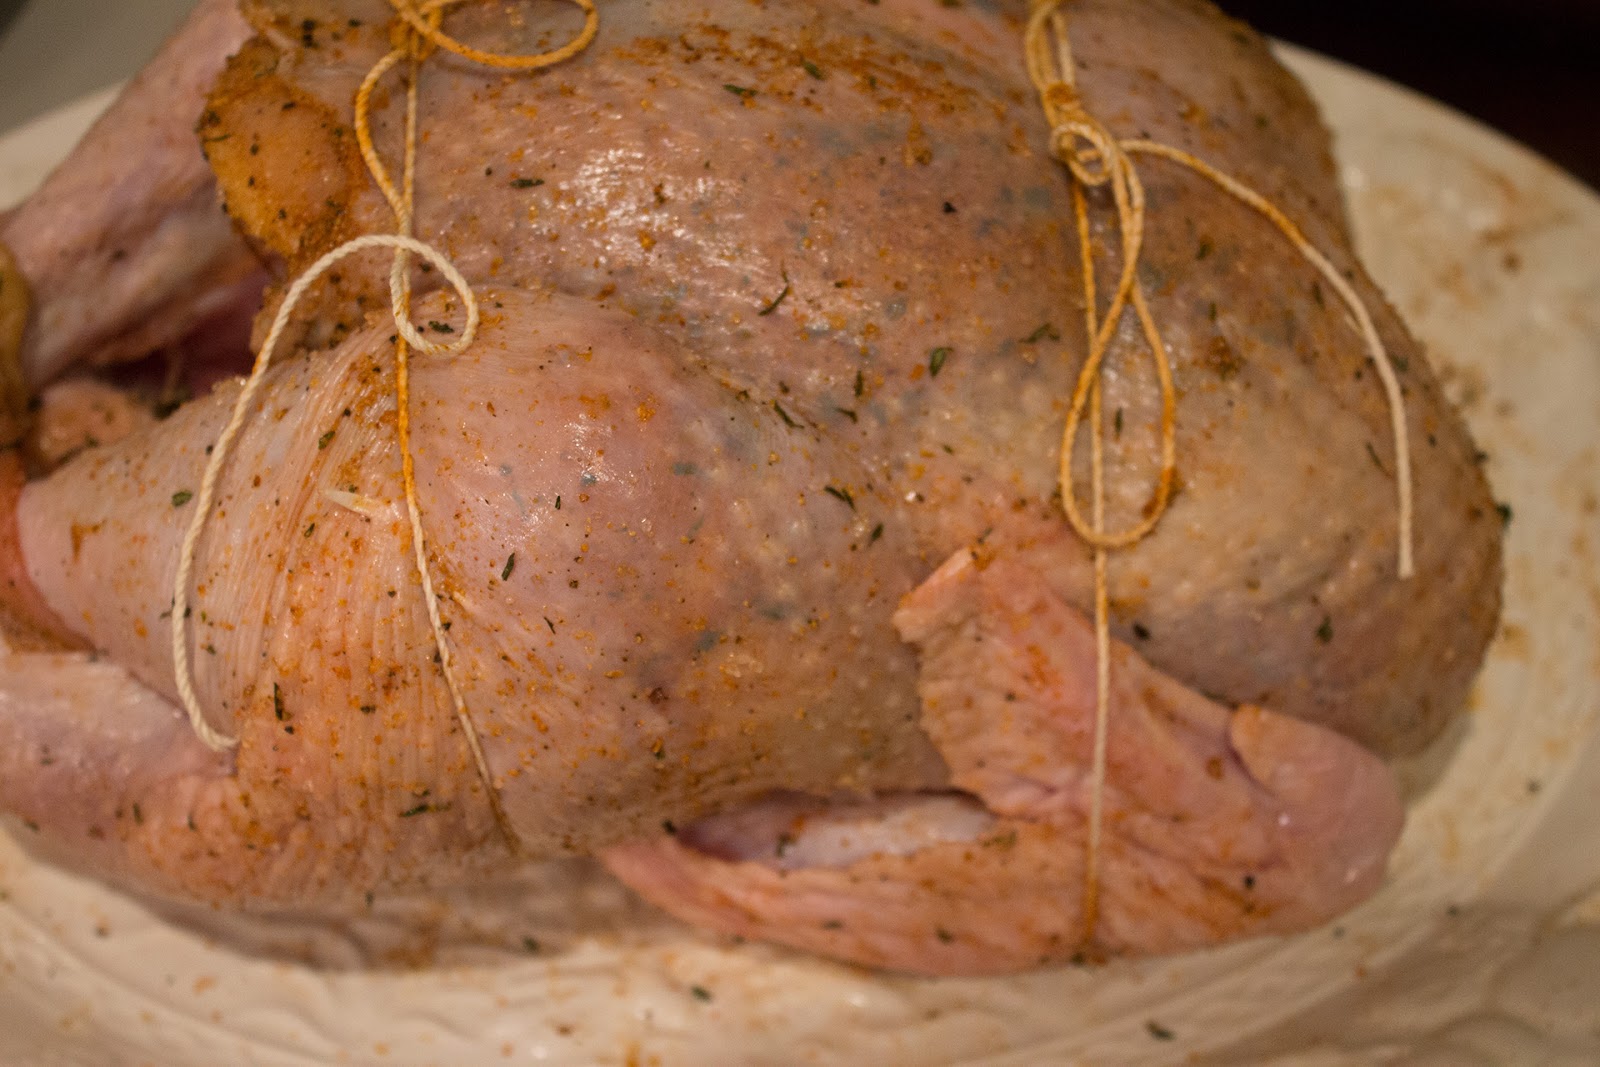
When she was all brined, I trussed her back up again, and then put her in the fridge. Do not wrap/seal her with anything (like plastic wrap), but if you're worried about her sitting in the fridge next to other stuff, just loosely tent her with foil.
Letting her air-dry really really helps with brown skin during cooking.
Three days from this point, I shoved some miscellaneous veggie waste (carrot and celery leaves, sage and thyme stems, etc.) in there and then plugged it with an entire, whole-but-peeled, onion.
Sear her for 5-10 minutes at like 500°, then drop the temperature down to like 275° or 300° for the remainder of the roasting. When she reaches 185° she's done. For those perfectionists, that means you could pull her out a little before this time as she will keep cooking for a few minutes afterwards, but myself I like to just physically see that number before stopping the oven. Honestly, a turkey that goes up to 190° can still be QUITE moist and juicy.
When you do take her out, make sure she has at least 20 minutes to set before you even TOUCH her! Just gently tent her with foil. If you cut her too soon, she'll just leak all that delicious juice out!
Honestly this is perfect most of the time anyway, because you're going to want to make a GRAVY!!! Right? Please tell me you're going to make a gravy...
Anyway, this method has taken me many years to master, and I have to say I can cook a pretty mean turkey at this point in my culinary career. This one was better than last year's, which was better than the year before's... so I guess it stands to reason that next year's turkey will be fantastic!
I quite like beans. Legumes. Pulses. Whatever. They're delightful.
They're extremely nutritious, satisfying, and kinda really good for you too.
In fact, and causing some chagrin in the wife, I try to make some sort of bean dish weekly.
Most of the time I buy canned beans of various kinds, which is OK—I believe—as long as you read your ingredient labels assiduously. If the ingredients are basically just beans, maybe beans with water, then you're fine... but be wary, some beans have added sugar, sodium, or worse!
Anyway, most of the time I use canned beans, but every so often I like to make a big batch of homemade beans.
Incidentally, if you're on a budget, go straight to the dried beans aisle of your grocer. These things are dirt cheap, last forever, and can feed an army.
You do have to 're-constitute' them a tad... which is basically just re-hydrating them by soaking them overnight.
First give them a good wash (rinse, scrub, rinse, with fresh water).
Then put them in a sealed container with enough water to cover them entirely. I use filtered water for this part, because most of it is going to be absorbed by the beans.
If this is just overnight, room temperature is fine, but if you wanted to let it soak for a day or longer, put it in the fridge.
If you were wondering what my six beans are here, I will now tell you. ;)
We have small white beans, cannellini beans (big white ones), romano beans (large brown ones), pinto beans (small brown ones), black turtle beans (little black ones), and garbanzo beans (chickpeas) (the pale yellow round ones).
Yum!
Those got soaked for a while (I left mine in the fridge for a couple of days... only because things came up and I wasn't able to make them when I thought), but when I pulled them out they were easily 50% bigger.
Also, the black turtle beans kind of stained the white beans! Heh heh heh. Whatevs.
I am a strong believer in cooking the shit out of beans. So that's the first thing I do. After I strain the beans, dumping the soak-water, I start a large pot with clean fresh filtered water, stir in a spoonful of salt, and bring it to a boil.
After it starts to boil, reduce heat to low, cover and simmer for hours. Yes. Hours.
Let's just say this: it is really, really, hard to over-cook dried beans. I dunno what it is about them... they're good to simmer a very long time, as long as there's still moisture in the pot (you should check periodically that all the water hasn't been absorbed/evaporated, adding more as needed).
Anyway, I might be exaggerating slightly, but I will say that I've simmered beans like this for at least a few hours.
Once they've plumped up nicely, and are soft to the touch (I don't like 'bite' to my beans... some do...I don't), remove from heat. You can let them cool off if you like, doesn't really matter.
Mmmmmm!
Anyway, that's actually the easy part!
While this is happening (and before the latest pic above), I roasted a shit tonne of veggies.
Well, technically I just roasted a red pepper and some tomatoes, but I prepped a tonne of shit. including onion, garlic, habanero pepper, and cilantro.
Starting with sweating the onion and some garlic.
I added a whole habanero. Well, minus the seeds and the placenta (yes, that's what it's called).
Saute that for a bit and then puree it with my immensely trusty immersion blender.
Then dump that puree into my slow cooker.
Where it will stay, awaiting my second puree, made from my roasted vegetables.
I find it satisfying peeling a roasted red pepper. I don't know why. I just do. It's fun.
For the tomatoes, I added an extra step I normally wouldn't for most other concoctions (like a sauce or a soup, for example), and I squeezed out any excess juice.
Why? Because I wanted to. Shut up and stop asking stupid questions.
No, seriously, because I wanted these beans to be 'dry' ish. I planned on putting these in 'wraps' or 'burritos' later, and I don't love liquidy filling that drips all over you when you try to bring it to your mouth hole.
:^)
Those roasted veggies I pureed along with a VERY generous helping of fresh cilantro.
And then added it to the slow cooker.
Stir in some herbs and spices, which, in order of concentration are: cumin, salt, oregano, and smoked paprika.
Using my trusty herb/seed grinder, I pulsed that up nice and fine.
Stirring the whole mixture together = flavour town.
A delightful base for many, many different dishes, this could go almost anywhere at this point. But we're going to take it to bean country. Show it around a bit... let it meet the locals and make some questionable decisions only even pondered when on vacation.
Stir well. Cover. Cook.
One of my favourite reasons to use my slow cooker, is that it keeps things so uniformly warm I can forget about it in a way I never could when using an oven. That can sit in there for hours with no effort or even thought from me. Useful when suppertime is not a guaranteed, set, time.
When it is time to eat, either eat is by itself, or spoon it out into some wraps. Masa Harina corn tortillas, wheat flour wraps, or even lightly blanched collard green leaves.... whatever... it's all good.
I recommend another generous helping of fresh cilantro though, on top.
This stuff is great.
Super delicious, and pretty darn good for you, this meal is not only satisfying and filling, but also brings a healthy spattering of nutrition with it, such that it is basically a healthy balanced meal in and of itself!
I like coffee.
I mean I'm not one of those crazytown home barista hipsters... but I appreciate a good brew... and I am willing to put in some small effort if it will improve my day-to-day cup of coffee.
My latest in this adventure, is my finally getting around to replacing my blade grinder with a burr grinder.
I resisted this change for years, simply because I thought I couldn't afford the best ceramic burr grinders out there, so why bother. I do that. A lot. I get discouraged because I can't get the best of something and then the resultant apathy means I miss out.
Well, although this isn't the best burr grinder, and it's a stainless steel one rather than ceramic, it's purportedly quite good.
In addition to reading many positive reviews online, I had the fortune of a direct recommendation from a friend of mine (shout out to Silent Node) for this product.
The product is the Cuisinart Supreme Grind Auto Burr Mill (DBM-8C).
And I like it.
It is certainly an improvement over my last grinder, a blade grinder, which I will still keep for nut and seed grinding.
So...
If you're in the know, I won't need to explain to you why I wanted a burr grinder. I will just say that so far this <$100 grinder is doing its job quite well actually, and that I am quite pleased with its performance.
For those of you who are like, 'what the eff? What's wrong with that other grinder? And what the eff is a 'burr grinder anyhoo?' Well... I'll try to explain.
There are a couple large reasons that a burr grinder is better than a blade grinder.
The first, and arguably most important, is that it makes for a truly uniform grind.
See, a blade grinder just keeps pushing the beans around, chopping them up until you stop it. This means that you are going to end up with some pieces being larger than others. And an ideal brew is one that uses all the same consistency of grounds. Makes sense, right? You want each chunk o' bean to receive the same exposure, and thusly to excrete the same amount flavour (and other things) as every other chunk o' bean.
A burr grinder operates instead by pushing the beans through an elaborate set of 'burred' cogs which can be set to specific sizes. Once set, however, you're sure of every bean being ground to the same size.
The second, less important (though many people swear by this) reason for a burr grinder, is that it has been said that the extremely fast, and harsh, chopping motion of the blade can impart a distinct flavour to the beans. The idea being the friction actually causes some heat scorch or burn to the beans. Although this seems entirely plausible to me, I can't say I ever noticed a whole lot of flavour difference.
For me, the main reason was the uniformity of the grind, and the ability to customize the grind.
It used to be that, in order to grind a coarse grind (for a french press, say) I'd have to just 'pulse' my blade grinder once, shake it a bit, pulse again, shake, repeat a few times until I'd had a relatively uniform but still rather large, grind.
Making a fine grind (for espresso, cappuccino, etc.) was a touch easier, being able to just hold down the button for a long time, but that is hardly precision work.
So, the adjustable dial is awesome.
Most of the time I leave it somewhere around the medium setting as I predominantly brew in my drip pot... but I have tried it both at its finest and its coarsest settings and have been quite impressed.
Sure it isn't the nicest burr grinder, but it's pretty decent, especially for its price point.
The grind is great, customizable, and can support a large amount.
This are arguably the most important things... so when I list the following negative aspects, know that they are relatively minor in the grand scheme.
Cons:
It's loud. Like hella loud. Like I worry my neighbours are going to complain.
It's slow. Maybe I'm just counting the milliseconds it takes to grind because it's so hella loud... but it seems to take forever sometimes! And—interestingly enough—the speed doesn't seem to be influenced by the grind coarseness i.e. a coarse grind seems to take just as long as a fine grind of the same amount.
It's messy. The little grounds container regularly needs to be 'swept' out using the included brush, but whatever, that's no biggie. I probably should have cleaned my old blade grinder more often, and in-between grinds too... but for some reason it seemed less imperative.
It's not air-tight. The storage compartment at the top for the whole beans seems like it would be a great idea. Just dump your beans in there and they're ready to be ground whenever you want... but I don't love how the (really cheap feeling) lid sort of just 'sits' on top without creating a seal. Now... this raises an interesting debate on whether beans should be stored hermetically or not in the first place. If so, why do most coffee bags have an 'air seal' built in to them? Oh, you've never noticed those? Check your bag of beans next time, and chances are there's a little pressure release valve (that's a nice way of saying it... really it's just a plastic hole kinda dealie) built right in. So... maybe it's not a big deal. Myself, I go through coffee quickly enough that those beans are likely not going stale in there.
So yah, a few minor issues to what is otherwise a great entry level burr grinder, and the latest worthy addition to my ever-improving coffee making experience.
A nice coarse grind in my bodum french press, with some perfectly-heated filtered water, steeped for the perfect amount of time, is still my favourite way to make coffee at home, and rivals the vast majority of coffees I've had out in the world.
Although a fine espresso or almond milk latte is also quite delightful. Especially as a treat on a cold wintry afternoon.
Anyway... it's a good addition, and looks quite nice next on my coffee counter if I do say so myself.
;)
I don't believe I've ever mentioned my Le Creuset Dutch Oven.
It was passed down to me from my Grandma, who was the most traditional Hausfrau you could imagine. Super German, and super awesome in the kitchen. I learned a lot just by watching her.
Anyway, this was the only thing I got from her, and my only keepsake from what seems another lifetime.
I don't claim to know much about Le Creuset, their product line, or its chronology... but I'm pretty sure this one is old.
Probably not like super old, but I'd guess at least the 70s. Possibly older.
I've tried to identify it, but there is surprisingly LITTLE information out there of Le Creuset's back catalogue... it's all recent stuff...
So, first off, if anyone reading this knows what this is, including age and colour identity, PLEASE let me know!
It is an enameled cast iron, like most of LC, but the only identifying marks are on the inside of the lid and on the bottom of the base.
Lid:
It clearly says LE CREUSET and FRANCE, in an old typeface. And "BC" on the other side. Weird that the lid is "BC" when the base is "C"... but they fit perfectly with each other... so not sure what's going on there.
The base also says LE CREUSET, and the only other identifying mark, which I think is just a plain, upper-case 'C'.
I'm pretty sure the 'C' corresponds to the size of the oven.
Anyway, it's really gorgeous still, and in relatively decent shape.
But... there is... something... happening on the inside.
When I brought it out this week, I noticed something was flaking on the inside, and when I picked at it, several large flakes of something came off.
I got scared at first, and thought that it was the enamel finally coming off.
Which would suck, because I'd have to get rid of it. Yes, I've heard their warranty and customer service is fantastic, but they clearly state you have to be the original owner. :(
But after a second glance, I'm not so sure that it is the enamel...
If it was the enamel which had 'flaked' off, wouldn't the exposed area underneath be black cast iron?
Cause it's not. It's very much white still...
So... was it instead the decades-old-baked-on-brown patina that flaked off?
You can see in a few places that brown/black stuff has chipped off, but surprisingly (to me at least) it is NOT showing bare metal anywhere.
So... does that mean it's still safe to use? I mean, I'm not afraid of using bare cast iron... I have many pieces of cast iron cookware, and I know how to season them with oil and keep them clean and such... so that isn't the issue here.
The issue here is that enamel. Once a pan begins losing its enamel, it is recommended that it no longer be used for fear that that ENAMEL could enter your food.
That's my only concern.
It doesn't look like it is the enamel that is coming off... but then what is going on with that black stuff? It never even budges when I scrub at it.
Honestly, when you look at it (and feel it) closely, it doesn't feel like baked on food particles or residue. It's so smooth to the touch it's weird. Like REALLY smooth... it feels strange. And it (normally) doesn't come off at all. Like even with things like barkeeper's friend and steel wool (I know, but I'm careful with it). So it's super weird that this stuff just flaked off on its own... Creepy weird.
Anyway,,, I think I feel safely enough about the fact that that is NOT enamel chipping off that I will in fact continue to use this awesome dutch oven.
But, if anyone reading this has encountered this before, or suggests I shouldn't keep using it, I would certainly appreciate hearing from you!
:)