So, how crazy is this?
Less than two weeks ago I posted an entry titled: "How to De-Stem Thyme".
In it, I complain about the time-consuming woe that is getting fresh thyme leaves separated from their woody, tough, stems.
I thought I had come up with a relatively decent methodology, and I mean, it works, but nowhere NEAR as well another technique I just learned today.
Today, in my inbox folder labeled 'food stuff', I received yet another of the multitudinous email newsletters from food sites and blogs to which I subscribe.
This one, from one of my lesser-liked sites if I'm to be honest, had right at the top of the page a link to an article entitled, "The Easy Trick to Getting Thyme Leaves off the Stem".
So, disbelieving as I am often wont to be, I hesitantly clicked the link, read the article and watched Epicurious' much-nicer-than-mine video.
Well... heck.
I'm never adverse to completely throwing away an old methodology, as long as a better one comes along, and so I happily and heartily give a shout-out to Epicurious, and apparently to the source, Erin Ireland from To Die For Vancouver (itstodiefor.ca). A site which, after only moderate perusal, I shall have to add to my ever-lengthening list of resources.
:)
So CLICK HERE to link to Epicurious' re-post (and slight tweaking) of Erin Ireland's brilliant idea to feed thyme twigs through a fine screen.
Personally my 'fine mesh screen' is WAY, WAY too fine for a thyme stem, but I did try this technique with a relatively finely holed colander that I have, and I have to say it worked extremely well.
So well, in fact, that I am chagrined for not having thought of this simple trick myself.
:(
Oh well, I'm still happy with the take-away from this experience, which is that I now can enjoy copious (COPIOUS!!!) amounts of fresh thyme, in half the time.
This one is kind of a cliche if you ask me.
It seems most mid-range Italian (or pseudo-Italian) restos will have this on their menu.
Often as one of their only vegetarian dishes... which is weird in my opinion.
Anyway, while I am a huge fan of the blue cheeses, and garlic cream sauces in general, I am actually not all that fond of gnocchi.
I'm not a full blown hater or anything... I mean they're potato dumplings made into noodles! That's delicious, right?
Well, yes and no.
In my opinion (which, you've come to know intimately by now) I'm all about the texture of a dish.
A velvety pasta sauce with an al dente durum egg noodle is fantastico... but the same soft and subtle sauce with an equally soft, tender, almost pillowy dumpling... it's almost frustratingly monotonous.
You know when you listen to something monotonous for so long it actually starts to drive you a little nuts? That's kind of how I feel at the end of a bowl of creamy gnocchi.
My preference for gnocchi pairing is a nice thin and tangy, very minimalist pomodoro sauce. It keeps the texture all down to the gnocchi without any other textural-based interference.
Anyway... that's just me. Many, many, many people positively adore gnocchi in a smooth, rich, cream or cheese sauce.
And for some reason, gorgonzola and other potent blue cheeses, are often paired with it. If I had to guess it is because the gnocchi by itself is actually fairly bland, flavour-wise. So pairing it with something very powerful is often a favourable contrast.
Well... that's enough of my own personal suppositions on the etymology and history of Blue Cheese Gnocchi.
The take-away here is that sometimes I do cook it for the wife, because she lurvs it. She had a craving for it, so I went out and bought some gnocchi and a brick of french bleu.
And here's how I make the traditional gnocchi in blue cheese cream sauce you'll find at startlingly many restaurants all over North America.
First thing right off the bat - you CAN make a low-fat version of this dish. It involves reliance on nut milks and vegetable oils, and can be fairly decent. I myself make an almost vegan version of this (I refuse to use 'faux' cheeses... if I want a full-on-vegan sauce, I just omit the cheese entirely for a "Vegan Cream Sauce" rather than try to fake a 'cheese' sauce.) that is quite good.
But...
This is not that version.
This is the full-fat version you'd find at a restaurant because that's how you wow people with flavour and have them leave content and impressed.
:)
So don't balk at the amount of dairy.
Just share a bottle of a nice Tempranillo Rioja along with it to help digest all those fats, and you'll be fine.
:)
That's my strategy... one that I've adopted from the French. Whenever I have a meal high in saturated fats, I almost always drink a couple of glasses of red wine with it. It really helps digestion, and I swear (this may be psychosomatic, I dunno) it helps me feel lighter and less weighted down after such a rich meal.
Anyway... you probably already do this, but if you don't, then I recommend you try this.
Begin with a buttery soffritto.
This particular one is simply white onion and garlic.
Then I do what most cooks do not.
I puree this soffritto. Reference above-mentioned focus on textural elements; this sauce is supposed to be extremely smooth and velvety, we don't want an errant onion chunk to throw off that consistency.
Add a cup of cream.
The MF% can vary according to your desire here. I wouldn't recommend going up to whipping cream (33%), but I have made some cream sauces with table cream (18%) that are just delectable.
I also wouldn't recommend going much lower than 5% (half and half) or 3% (homogenized milk) either.
The thing is, the more dairy fats in the sauce, the easier it will be for the cheese to become incorporated (melt into the sauce uniformly). If you've ever tried to melt butter or a high-fat cheese into skim milk you'll know it's really hard on its own. Trying to mix polar and non-polar liquids is trying (layman's terminology: oil and water do not mix). It can be done (like with the help of a roux or some dissolved corn starch...) but really it's so much easier to dissolve your fats into something which can absorb it.
So, for company, dinner parties, or when I really want to impress, I'll use a litre of table cream, but for most purposes homo milk (3% milk) works well for my purposes.
So, I just blend in a cup of cream (milk) right into the puree mixture.
If your cream (milk) is too cold, you'll run the risk of turning the butter into solids, so it's a good idea to let it get to room temperature before mixing it in.
Now... that's the flavour munchkin right there.
Before adding that back to your pan... we want to first make a roux (if you want a gluten-free recipe for this, which is actually half-way there already with the use of potato instead of wheat noodles, you can omit the roux, and just opt for less butter and a thicker cream instead... cook that down for a few minutes and it will still thicken nicely).
So, some more butter. Melted over medium-low heat.
Then a generous spoonful or three of flour (depends on how much sauce you're making, or how thick you want it). It doesn't have to be super specific... you can always balance it out later, and because it's much easier to just thin out an overly-thick sauce with a bit more liquid (cream/milk) I usually opt for a thick roux right out of the gate.
Whisk that in and then let it simmer for a few minutes, until the flour gets a nice light-golden colour.
Then carefully pour your cream/milk/soffritto mixure in.
Now, you shouldn't have had this roux cooking at a very hot temperature, but if you did... stand well back when you pour this in, cause you'll get some splattering.
In fact, it's a good idea to just always be mindful when mixing a cold liquid to a hot liquid.
Unexpected culinary spatterings can be dangerous, after all!
:)
Anyway, it should have been on low temperature and the two mixtures should incorporate well, and quickly. In fact, after you've whisked it in and turned the heat back up a little to, say, medium heat, the thickening should begin.
I love this point in making sauces.
The white sauce.
So, so, so many sauces get their start from this humble beginning.
Look at that smooth texture and the glossy (almost brilliant) sheen!
Yum!
Anyway... I'm going to mix in a few fresh green herbs first.
Fresh and finely chopped thyme, basil, and scallion tops. For a quick and dirty tip on de-stemming thyme, check out my previous post with an included video!
That should tilt the flavour nicely towards where we want it, because honestly everything in this sauce is going to play second fiddle to the blue cheese. The cheese is so dominant in flavour, it's going to hit heavy and hard right when it touches your tongue. But after a few mouthfuls, you'll start picking up on some of these subtle, ultimately complementary, ancillary tastes.
Anyway, without any more preamble, let's introduce the star of tonight's dish.
Tonight we have an exceptionally bold French cheese, "Bleu D'Auvergne"
Mmmmm...
Look at that flavour!!!
Hoh man.
Anyway, it was pretty strong stuff, so I just put in half to start out.
It took less than a minute of gentle stirring for it to blend in nicely, and after a quick pinch of sea salt and freshly ground pepper, I deemed it was perfect.
So, boil some gnocchi (for a very, very short period of time... like 2 minutes).
Plate, pour, and serve.
Mmmmmm...
If you love the pillowy soft, pungently-strong combo of gnocchi and blue cheese, this dish is comforting, warming, and extremely filling (those are dumplings made from potatoes, after all!)
:)
So, if you're like me, you love fresh green herbs, but detest the prep work involved in using them.
Some herbs are easy.
Basil, for example.
Wash, dry, chop (or not).
Oregano as well. I usually chop oregano though, cause the stems can be a bit of a mouthful.
But there are some herbs which are just a freakin' bitch.
And other than Rosemary, Thyme has got to be one of the worst.
Sigh.
I always commit to it though, because the rewards are worth the effort.
Anyway...
If you're experienced with this (or just smart enough to figure it out) I apologize for talking about something with which you are already very well acquainted.
If you're a thyme noob, though... or by some chance have never figured this out... I'll show you my technique for making large batches of thyme ready for consumption.
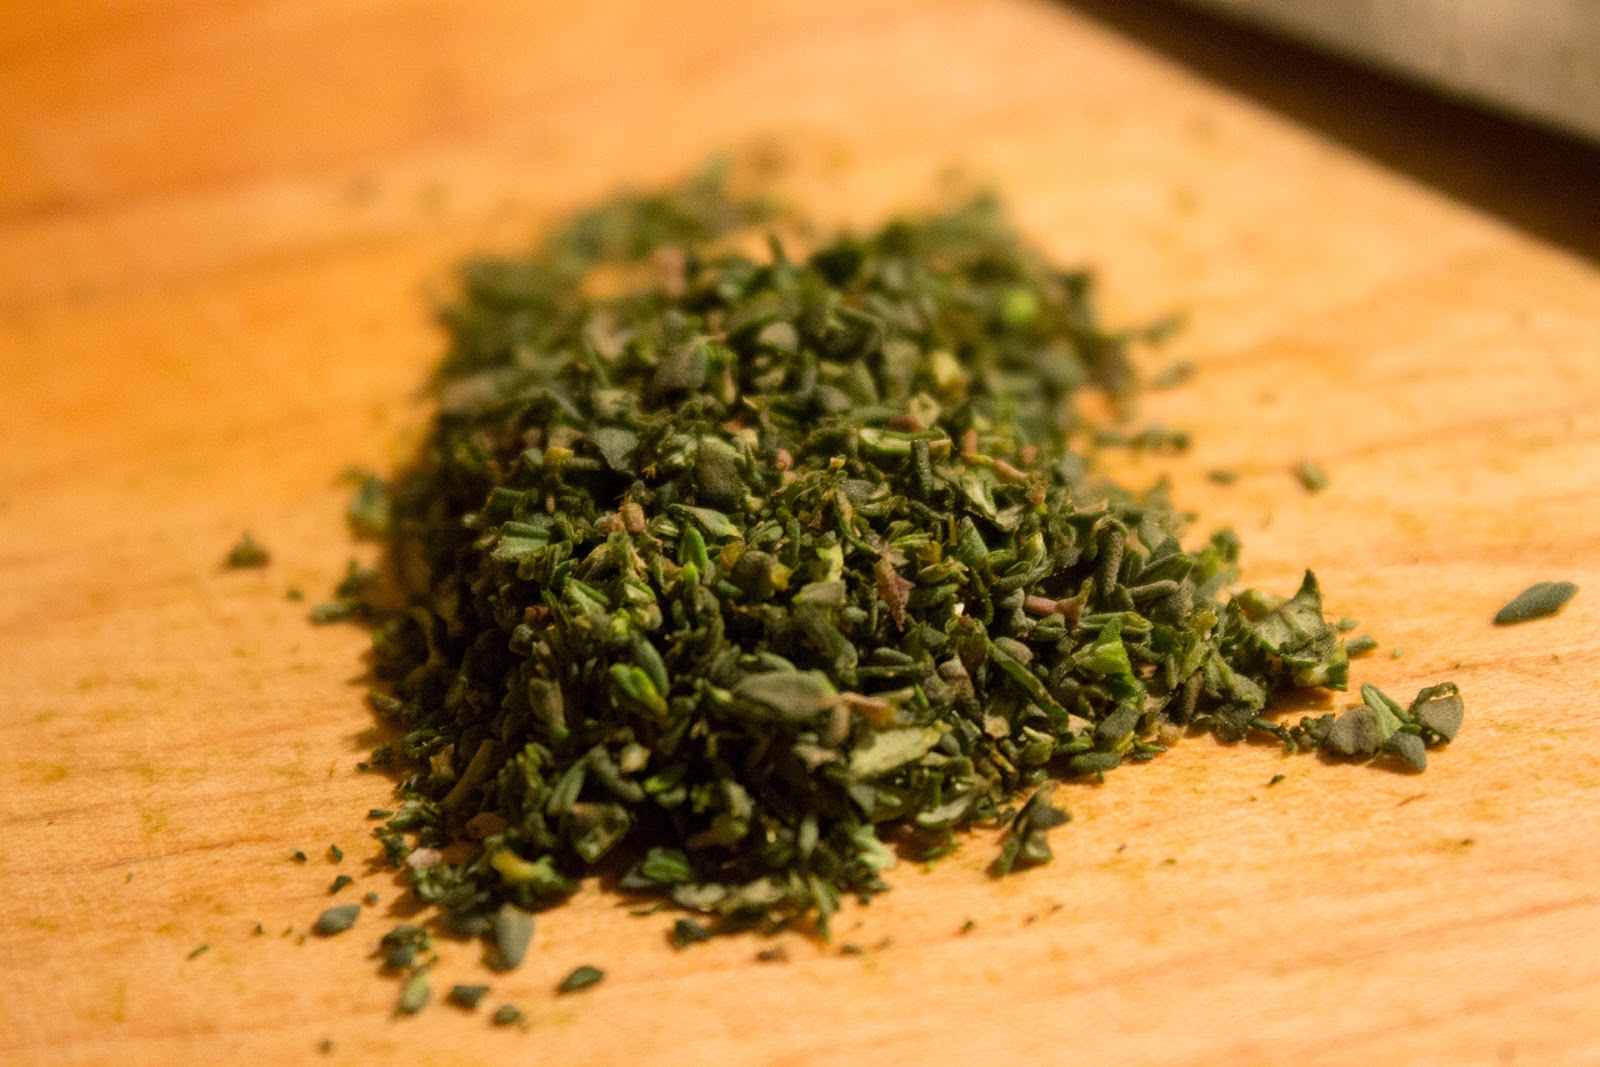
And in a matter of a few minutes can turn this:
Into this:
So, first separate the thyme into individual sprigs/stems.
Then, with your thumb and forefinger of each hand pinch the dense but thin end right beside each other.
Gently and slowly run your pinched fingers down the length, basically running the opposite direction to the natural growth direction of the leaves. This essentially snaps each 'branch' back on to itself.
They should just pop right off.
Each stem of thyme seems to have a weak spot for about the top 1/8 or so of its length. Try not to just rip that off, but it will happen. I'd say at least half the time I end up just popping the top off. It's not really a big deal, when that happens I just pinch the next top-most spot available.
Anyway... a picture says a thousand words, so I compiled a moving picture. A movie if you will.
;D
I hope it helps illustrate what I'm talking about.
In any case, that's the stripping part.
You'll still be left with little bits of stem, but at least this gets rid of the large stem(s).
The little, softer, greener, and more malleable 'stems' I usually just CHOP.
Yup.
When I was younger and had more time on my hands, I might sometimes fall down a 'de-stemming thyme' hole. But now, I just get the 'woody' stems out of the way, and then just go to town on what's left with my chef's knife.
These 'stems' are not really too bad. Why do I say that? Because they're still soft enough to chop nicely.
In the end, and after all your hard work, you can have a nice, somewhat fine, relatively uniform pile of fresh thyme!
To be put in anything cheesy, meaty, or even tomatoe-y, thyme is one of my favourite herbs, especially for french cuisine.
Yum!
So, because we're seeing what are sure to be some of the last few cold days we'll be seeing this year, I decided I yet had time to sneak in a good roast beef before the end of the season.
In fact, I don't think I've done a roast beef since last winter anyway... don't really make many of them.
Usually, when I do, I make the traditional roasted onion, potatoes, and carrots kind of dealie, dry roasted in a dutch oven. The wife is a big fan of this old timey meal.
However, a delightfully fun, delectably delicious, and deceptively easy alternative is to make French Dip Sandwiches.
Essentially just braised roast beef, sliced relatively thinly, and served in a roll with onion and a generous pot of jus (beef juice from the braising/roasting), this is just as comforting as any roast beef (if not more), and a lot easier to make, eat, and serve.
And it's FUN! The bread gets all soggy from the jus, but that doesn't stop you from dipping into the pot for even more jus every bite! Mmmmmmm....
Anyway, you'll see it's easy.
First, treat the beef like you would any other, searing it with high heat on all sides real quickly before slow cooking/roasting/braising.
We picked out a really cheap cut, that actually turned out to be quite perfect for this.
I rubbed it down in some avocado oil, and a pinch of salt and pepper, and then gently seared each side in a very hot, pre-heated pan.
Make sure to get ALL the sides. That maillard reaction browning is the good stuff.
Use tongs to get the awkward sides.
Once all the sides have browned nicely, set the beef aside; in your slow cooker if you're using one, otherwise in a medium sized dutch oven.
Myself, I'm using a slow cooker.
That's basically all the work you need to do for the beef, until it's done and you slice it up.
But the best part about that searing you just did?
The gribblies!
Let the pan cool down substantially (I usually take it right off the heat), but after a few minutes put it back on to 'low' heat.
And saute a generous amount of sliced onion.
Be sure to add another generous glug of oil in there, and periodically scrape the bottom with a metal implement (like a wire whisk).
After a few minutes, the onions should start to turn nice and golden, and all of the gribblies should be incorporated.
Once they're like one quick step away from becoming caramelized, pour in about two cups of beef broth. Don't use any other kind of broth, OK? It has to be Beef Broth.
Let that mingle for a minute or so, and feel free to scrape around, getting the bottom and the sides of the pan, to get any wayward gribblies.
Then, carefully pour the entire contents on top of your beef, in your slow cooker or dutch oven.
Because I'm a miser when it comes to flavour (flavour miser, that's me), I did a second round of deglazing.
I poured the rest (another 2 cups) of my beef broth into the empty pan, and reduced it a bit. Then poured about a half a cup of red wine in as well, also to reduce for a bit.
This helped bring up the level of liquid in my slow cooker to cover just enough of the beef as to do a nice job of braising.
Next, and lastly before the slow-cooking, I added a very generous blanket of fresh thyme leaves.
It takes me many a minute to carefully prepare thyme, but I find it worthwhile, as thyme is one of my favourite green herbs.
If you're interested in my technique, take a hop, skip, or jump on over to my post on "How to De-Stem Thyme". It's quite edifying if you're inexperienced... :)
Stir in that thyme, and a bit more salt and pepper, and it's ready to slow-cook.
Believe it or not, you're actually not supposed to cover your meat entirely with liquid, when braising. I'm not entirely sure why, but I'm sure there's a good reason... and someday I'll happily learn that.
But for now, I make sure to leave the top 1/8 or so of the beef, and then cap it off with the lid, and set it to slow cook for a few hours.
It was about 5 hours, actually.
:)
Shortly before serving, I very very lightly toasted two fresh white french sandwich rolls.
And then slathered some dijon mustard on each side. Not a tonne, mind you, just enough to mingle with the flavours.
And now to check on the beef.
Hoh man oh man.
Take out the beef and let it sit for a few minutes on a cutting board (the kind with juice-catching grooves).
While the meat is resting, strain some jus.
We're not making gravy here people. In fact, one of the characteristics of a good beef jus, is its clarity. We want it to be really pristine looking (and feeling... in terms of texture...)
So, a couple rounds of straining.
First, a medium colander to catch all the thyme, and onion.
And then a fine-mesh sieve (or cheesecloth if you don't have one) to strain anything that got through the first round.
Some cute serving bowls/ramekins are essential here. It really helps to sell the whole "you're supposed to dip your stuff in here" thing.
And you want to serve each person one, you get that right? These are individual jus dips, and served right on the plate with the sandwiches.
So, I made two of these.
Then it was on to carving the beef.
Mmmmmm...
Try to slice as thin as you can, but not if it's going to massacre the beef.
Mmmmm.... I'd say these were between 5 and 10 mm.
So, now that everything is ready, time to assemble the sandwiches.
First pour a little bit of the strained jus (you should still have lots of this left) directly on to the bread. This helps to give a head start to the sogginess (which is desired, trust me).
An optional step is to cut up a couple of slices of a good french cheese.
I opted for a nice smokey gruyere.
Then, layer up the beef slices, taking care to distribute them evenly.
Then close up the sandwich, garnish with some fresh thyme sprig(s) if desired, and don't forget the pot of jus!
The next step?
Grab, dip, bite, chew, swallow, and love.